The Brother ADS-2000 High Speed Document Scanner is a great scanner for Evernote, but you would never know it! The Evernote scanning forums never mention it and the scanner documentation never mentions Evernote. In this tutorial I will show you how to configure the ADS-2000 one-button-scan feature to save to Evernote in Windows. It will function very much like the Web Clipper does. On the web you just surf to a page you would like to keep in Evernote then select the Web Clipper, like magic the web page shows up in the _UnSorted folder of Evernote. With this scanner we can do basicly the same thing, just drop in a reciept or document in the scanner and press the Scan-to-PC button and the document will show up in the _UnSorted folder of Evernote. I had my ADS-2000 for over a year before I found this feature. I hope you will find this usefull.
Configuring the Brother ControlCenter 4 Software for Advanced Mode

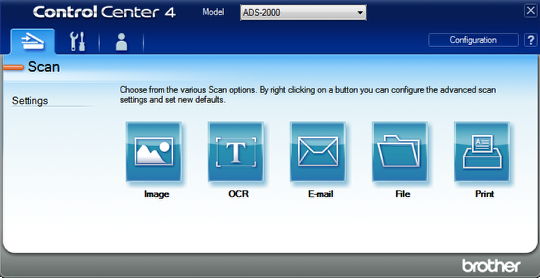
You must have the Brother ControlCenter 4 software loaded and be in the advanced mode. If you are not already in the advanced mode follow these steps.
1. Open the Brother ControlCenter 4 software
2. Click Configuration button
3. Choose Mode Select
4. Choose Advanced
5. Choose OK
Your ControlCenter 4 should look like this in advaced mode with 3 tabs and 5 buttons.
Choose the Device Settings Tab

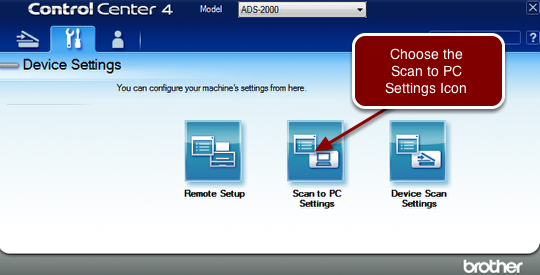
From the ControlCenter 4 main screen choose the Device Settings tab.
Choose the Scan to PC Settings

Before doing this next step make sure your scanner is awake. If your scanner is asleep you will get an error when your PC attempts to connect. To wake up your scanner just press the red button and the green power led will light up.
Click on the Scan to PC Settings.
Configuring the Scan to PC Settings

Select Image from the Scan to drop down then select OK.
Choose the Device Scan Settings

Configuring the Device Scan Settings

1. Select Image tab
2. Select File Type PDF ( PDF allows multiple pages it also will be indexed by Evernotes Cloud servers)
3. Select Target Application Evernote
4. Select File Size Small ( this is optional but I found the small files were much smaller and still looked great )
5. Click OK
Your First ADS-2000 to Evernote Scan

Insert your document to scan then press the Scan-to-PC button.
Evernote Displays the Scan

Evernote Displays the scan in your _UnSorted folder. So you can now easily tag and title the document or move to a specific notebook.
Conclusion
Scanning into Evernote from the ADS-2000 is very simple once the Scan-to-PC button has been properly configured.
Just drop in your document and press the Scan-to-PC button on the scanner and the document will magicly appear in Evernote a few seconds later.
You do need to leave the ControlCenter 4 software running in the tray. However do not need to have Evernote open. If Evernote is not running it will start automaticly when you press the Scan-to-PC button.

1. How do you find control center 4 – is it Mac compatible – must this be downloaded?
2. Is the procedure you describe for accessing EverNote compatible with the Mac?
I’ve followed the Quick Setup Guide and am able to scan documents, but would welcome any suggestions as to where to go from here – would like to be able to scan in advance destinations (like EverNote) for better organization.
Thanks much!
Henry,
ControlCenter 4 is only for Windows. However there is a ControlCenter 2 that runs on OSX that I found on the Brother support site. I’ll give it a shot and see if it will work the same as the Windows version.
It also works under OSX, but Control Center is version 2 in this case.
I cannot seem to get Evernote recognized as a choice. Any advice.
Paul
I also can’t seem to get Evernote recognized as a choice. Any suggestions??
On another Brother scanner I couldn’t get Evernote to be recognised as a target application device.
I got round this by temporarily making Evernote the default application for PDF’s, and this added the Evernote as a menu choice.
FYI in Control Centre 3 you could browse to Evernote as the application, not so in version 4.
Grrrr